Wednesday, February 28, 2018

The Landing / Upstairs Hallway

Right on the tail end of finishing the bedroom (the same day, actually), we went ahead and primed and painted the landing as well.  I needed something to do while the hubs was installing carpet.  This is what it looked like before I got started.  The first photo is taken from the doorway leading to the front bedroom.  The second is from the corner shown in the first, so you can see into the bathroom and down the stairs.


This is what it looks like with the awesome Oops paint I bought at Menards for FIVE dollars!  Guys, seriously, before you drop real money on paint, check out the "Oops" paint.  Basically, it's paint other people had mixed and decided they didn't want.  To keep those people from coming back and getting what they asked for at a discount, the store changes the color before putting it on the Oops shelf.  But that means you could find just about anything.  Of course, it also means you have no idea what you'll find, but they dob a little on the lid to allow you to see the color before you buy it.  Anyway, this is what I got for the space that the hubs will be using as his office.


Bonus: me sweeping the floor ever-so-gingerly so as to not kick dust up onto the still-tacky walls, so the hubs could roll primer over the floor before we left for the day.  Can I tell you a secret?  I like the Oops paint more than the colors I purposely chose for the bedroom and bathroom.  Who'd have guessed?

The Bedroom


We decided that, once the bathroom was completed, we should create some usable living space.  If we're going to be living here, that makes sense, right?  So, halfway through February, we started with the back bedroom that faces out onto the yard and the field behind it.  This is what it looked like when we bought the house.


This is after we (translation: the hubs) pulled out the nasty, peed-on carpet (2018-02-10).  What you don't see is the giant hole in the door where the dog that was apparently kept in this room against its will attempted to dig its way to freedom.  Sad.


The hubs also chipped away the cracked drywall mud and remudded all the seams in the room, so it would look more finished.  He did this over the course of a few days, working on it after he got done at his "day job" each day, and also working through the whole upstairs, rather than just doing one room.  Love this man!  We're assuming that all his hard work will be for naught and will all crack again when we raise up the main floor to level it, but it's pretty for now.  We also primed the entire room (ceiling, walls, floor) with the same oil-based primer we used in the bathroom.  We learned from our earlier escapades, though.  We propped both bedroom windows open to allow a breeze to blow through to cut down on fumes.  We also saved the floor for last.  While the ceiling and walls were drying, we went to lunch.  Then we came back, closed the windows, rolled primer on the floor, and we left.
 
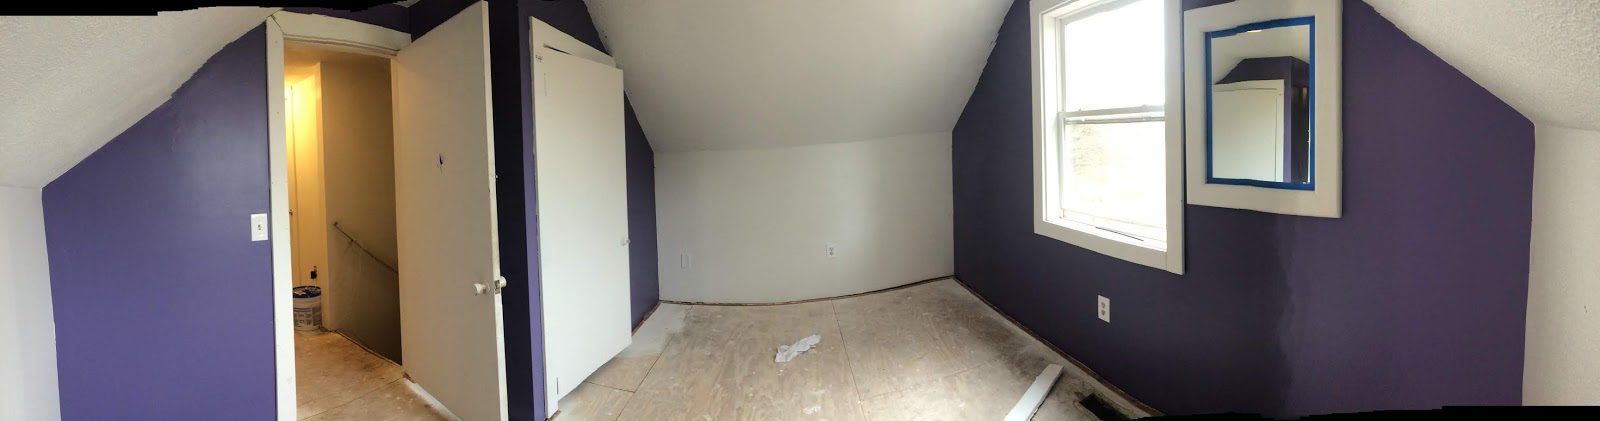
The next time we went to the house (2018-02-24), we painted the side walls (north and south, south showing) and ceiling with ceiling paint and the front and back walls (east and west) with "Royal Fortune" (purple).  The second photo is my inspiration photo from the paint web site.


Then, we added carpet (a remnant from Home Depot) and a few homey touches (2018-02-28).  And yes, that's padding already attached to the carpet!  No need to install it ourselves (or pay more to get it).  It's not super-duper squishy, but it makes getting up in the morning nicer than it could be.


Isn't it pretty?

Confession: I admit that the paint turned out a bit darker than I had anticipated, but we're both (yes, both!) happy with it.  The decision to not paint the half walls has really helped to make the room feel bigger than it would have, too.  Isn't it great when things work out how you'd hoped?

Sunday, February 18, 2018

Making a Mess

As if my beautimous bathroom weren't enough for one day, our son came up to help us with a little demolition as well.  Remember the original chimney in the kitchen?  The mortar-coated chimney that's taking up precious real estate?  Well, that took a bit of a beating today.

Heads up - this post is packed with photos and videos, so it may take longer to load than normal.

These initial pictures show the progress of the mortar removal.  The boy was armed with two 5-pound sledge hammers, one with a chisel side.


Of course, the hubs couldn't let the boy have all the fun.


The initial bricks removed ...


And yes, we're all wearing safety goggles and masks.  There's tons of soot in that chimney and lots of flying debris.


Here, the boy got a little exuberant.  He then closed with a video game reference. (=


 A big chunk of the front portion is gone so far:


And the hubs took over.  The bit where there's a single width of mortar holding up the entire back portion and all the chimney still above the ceiling gets me every time.


The soot went everywhere (even upstairs a bit, though the bathroom was spared).  Even with masks, we all breathed some of it in, so we called it a day.  Good fun was had by us all.

It's Potty Time!

Yes, I'm that silly. (=

Today, we primed the bathroom floor to seal it.  Then we installed faux linoleum (purchased on sale from the remnants at Menards), and then the hubs put in our brand new toilet (under $89.00 at the Home Depot).


The flooring comes in 12' wide rolls.  We got a 12' x 12' piece.  First, we had to unroll it in a clean area, so we took it to the front rooms downstairs.


Then, we measured and cut a 6' x 6' piece.  The bathroom floor isn't exactly that size, but it is larger than 5' at its widest and at its deepest.  So, we knew this would give us full coverage.


We didn't get a fancy toilet.  How fancy do they really need to be anyway?  But it's brand new, and it's ours ... some assembly required.


And then we put it all together.  (and we forgot to take the bottle of cleaner out of the shot.)


Before and after:


Isn't it beautimous?!?  The cabinet door and drawers are in the front bedroom floor right now for cleaning.  We're also thinking we'll paint the cabinet white to add a bit more brightness to the room.  We shall see.

Saturday, February 17, 2018

Transformation Time!

Happy Saturday!  It's time for actual paint!  I absolutely love how transformative a simple coat of paint is.  I get super excited (and sometimes a tiny bit terrified) just prepping for it.  Today, we finished painting the upstairs bathroom.  Just as a reminder, this is what it looked like before:


First, I went ahead and painted the ceiling and the short wall with semi-gloss in white.  Since it's a bathroom, I want a paint that's going to hold up to moisture and whatever else life throws at it.

 
It's white, so it kind of blends in with the primer, but it's shiny. (=


Once that dried, I moved my tape lines to protect what I painted in the morning, so I could start putting up color.


Hubs helped again with taping the high up spots.


I'll let you in on a little secret.  I do not spend piles of cash on paint.  I visit paint websites to find colors I like, and then I find the cheapest paint in the finish I want (semi-gloss, satin, etc.) in a trusted name.  In this case, I went with Glidden paint in semi-gloss.  The color I chose for the bathroom is Gulf Waters by Behr.  It's bright, but not too bright.  And since I kept the short wall white (and all of the trim), it doesn't overpower the small space.


Time to remove the tape!


Isn't that better?